Categories
Development

The simplest anomaly detection algorithm in Javascript – zscore

zscore can be used to basically answer by how much (in standard deviation) a value is more or less than the mean. For example if your mean is 5, standard deviation 2 then if you encounter a value with a zscore of 2 this means that the value is 2 standard deviations above the mean and could be for example 9 depending on your distribution.

You could then set a maximum to alert for all values which has a zscore of for example 2 or above. Below is a sample algorithm to compute zscore from a series of values.

var array = [];
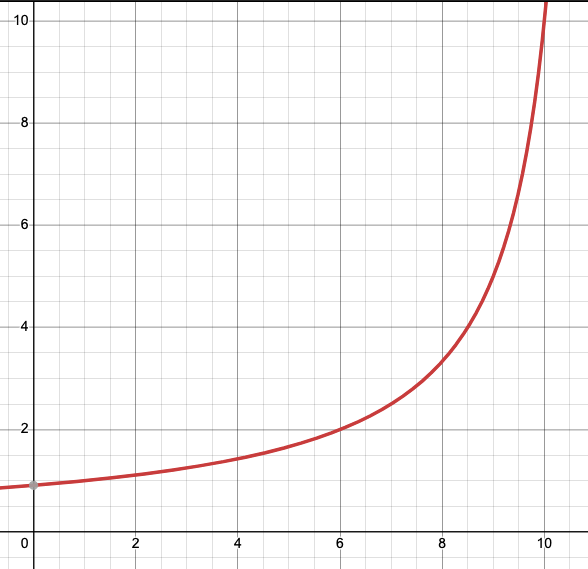
// based on code to generate array with a spike based on https://softwareengineering.stackexchange.com/questions/274424/generate-random-numbers-with-certain-spikes
// which defines an exponential function
for(var i=1;i<=10;i++){
  array.push(1/(1.1 - i/10));
}
console.log(array);

var bucket = [];
var bucket_size = 10;
var zscores = [];
var means = [];
var stds = [];

for (value in array){
  if (bucket.length >= bucket_size)
    bucket.shift();
  bucket.push(array[value]);
 
  var mean = bucket.reduce((a, b) => a + b, 0) / bucket.length;
  means.push(mean);

  var standard_deviation = 
      Math.sqrt(bucket.map(x => Math.pow(x - mean, 2))
                .reduce((a, b) => a + b) / bucket.length);

  var zscore = (array[value] - mean) / standard_deviation;
  zscores.push(zscore);
  
  stds.push(standard_deviation);

}
console.log(zscores);

Generating a series of events containing a spike

We have used an exponential algorithm inspired from stackoverflow: https://softwareengineering.stackexchange.com/questions/274424/generate-random-numbers-with-certain-spikes, see link in the code, to generate a series of events which will contain a spike at the end. You will notice when running the code that the zscore at the end is much more.

Bucketing the series to calculate zscore

We are bucketing the series into 10. In this case, the whole series length is 10 but we have added bucketing to help you handle bigger series. In a larger scenario you might run out of memory if you do all these calculations for the entire series in memory and also having a certain search window (defined by bucket size) can yield better results depending on your use case.

The code then just follows the regular zscore formula. The changes that you will need to do on your own is to go through the zscore and determine on which threshold you want to determine if a value is an anomaly.

This example outputs as follows:

0:
nan
1:
1.000000000000002
2:
1.2675004445952607
3:
1.4431464156799216
4:
1.5898283996891684
5:
1.7324006038049409
6:
1.8875705026381895
7:
2.073829320618413
8:
2.321061996113484
9:
2.688231708712125

So if we alert on a z-score of 2 this will alert us as from the 7th value which is a good detection of the spike.

If you want to learn about more algorithms like these ones I would suggest looking at this course on Coursera:

More about the course –

Inferential statistics are concerned with making inferences based on relations found in the sample, to relations in the population. Inferential statistics help us decide, for example, whether the differences between groups that we see in our data are strong enough to provide support for our hypothesis that group differences exist in general, in the entire population. We will start by considering the basic principles of significance testing: the sampling and test statistic distribution, p-value, significance level, power and type I and type II errors. Then we will consider a large number of statistical tests and techniques that help us make inferences for different types of data and different types of research designs. For each individual statistical test we will consider how it works, for what data and design it is appropriate and how results should be interpreted. You will also learn how to perform these tests using freely available software. For those who are already familiar with statistical testing: We will look at z-tests for 1 and 2 proportions, McNemar’s test for dependent proportions, t-tests for 1 mean (paired differences) and 2 means, the Chi-square test for independence, Fisher’s exact test, simple regression (linear and exponential) and multiple regression (linear and logistic), one way and factorial analysis of variance, and non-parametric tests (Wilcoxon, Kruskal-Wallis, sign test, signed-rank test, runs test).

Categories
Gaming

Can you play Apex Legends with keyboard and mouse on ps4 & ps5 ?

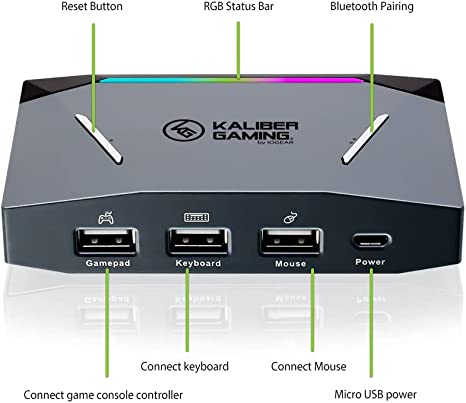
Yes you can but you will need to buy an IOGEAR KeyMander 2 Keyboard Mouse Adapter. And for PS5 you will need to buy a third party controller as well. The official PS5 controller is not supported yet for the KeyMander 2 (Oct 2022).

Where to purchase the IOGEAR Keymander 2?

I would suggest actually purchasing it online on Amazon because you should be able to return it in case you are not satisfied. Just make sure that you keep the box intact during unboxing and not to throw anything away. Below is a sponsored/affiliate link:

How to setup IOGEAR Keymander 2?

  1. Plug the mouse in the mouse USB Type A port as shown in the picture
  2. Plug the keyboard in the keyboard USB Type A port as shown in the picture above.
  3. Plug in the ps4 controller in the keymander
  4. Now plug in the Keymander to the console PS4. The device should light up indicating that it is on.
  5. Download the app https://play.google.com/store/apps/details?id=com.iogear.ge1337p2&hl=en&gl=US
  6. Turn on bluetooth on your mobile phone and then use the app to connect to the keymander
  7. You can then do a firmware update if you want
  8. You can then use the app to customize mouse DPI and even macros. But for Apex Legends you should not use Macros because it is not allowed and can get you banned.
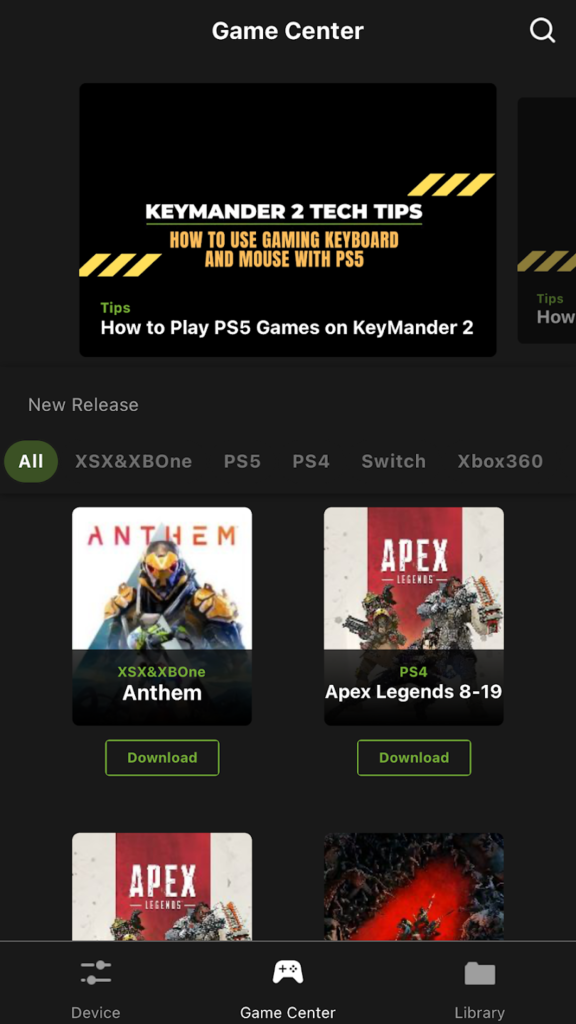
  9. You can download a Preset configuration for Apex Legends too (you will need to create an account)
  • Have fun 🙂

In case you are not able to buy or use the Keymander then we recommend checking the Best Apex Legends Aim Assist Settings to become a beast with controller.

Categories
Gaming

How to toggle always run / auto-sprint in Apex Legends

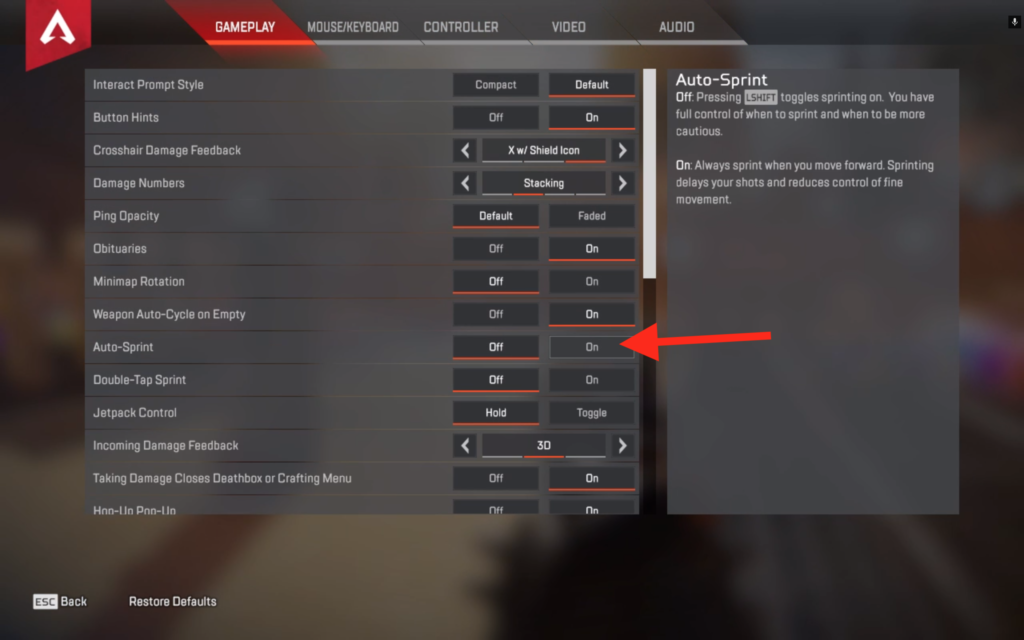
Go to settings->gameplay->Auto-Sprint->On. Find a screenshot below to help you find it.

This applies to both MNK(mouse/keyboard) and Controller. I remember messing up my old controller’s left stick because of this. I had to play with stick drift. My character was always moving forward for the whole season XD.

Categories
Gaming

Can I play Apex Legends on Geforce Now?

Yes you can! You can play for 1 hour free and then you will need to buy an upgraded membership.

What is the latency for Apex Legends on GeForce Now?

Pretty damn good, the latencies are below 10 ms it is crazy. Check this screenshot out from Luxembourg.

You will also need to do a network test from your router to GeForce now. You will need to download the GeForce Now App, then go to settings then Test Network.

DO NOT USE https://pingserverstatus.com/ it does not show you real ping like the GeForce Now App.

My latency to the GeForce Now servers are at 24ms. To add this all up the total latency that I get when I play Apex Legends on Geforce Now is 28 ms which is amazing.

Also as an added bonus it runs smooth at 60 fps, even when I play on Wifi on my 2016 MacBook Pro. What a time to be alive!

Categories
Administration

How to fix Docker unauthorized from pulling from github private packages/ghcr.io

If you get the following error: “Error response from daemon: Head <repo-url>: unauthorized” this likely means like either you do not have the permission to access the repository or you need to login with docker before pulling the image.

Step 1: docker login ghcr.io -u

This will give you a prompt to enter your password:

Password: <insert your personal access token here>

Where to get your personal access token for Github?

“In the upper-right corner of any page, click your profile photo, then click Settings. In the left sidebar, click Developer settings. In the left sidebar, click Personal access tokens. Click Generate new token.” from https://docs.github.com/en/authentication/keeping-your-account-and-data-secure/creating-a-personal-access-token

At the moment of writing the format of the token starts prefixed by “ghp_”. I would recommend setting a short expiry time and limited permission as a safety precaution in case the personal access token is leaked for any reason.

How to know that login is successful?

If you get “Error response from daemon: Get “https://ghcr.io/v2/”: denied: denied” this likely means that you have set the wrong password (or no permission to the repo).

But in case the login is successful you will get “Login Succeeded”. You should then be able to pull your docker images.

Finally, if you want to login without a prompt you could also run:

docker login -u your_github_username -p your_personal_access_token https://ghcr.io

Categories
Uncategorized

Could you use Honeygain to pay for your phone?

In short you could if you satisfy the following conditions:

  • Ideal location
  • Number of IP addresses you have available
  • Network’s ping/speed
  • A mobile plan with at least 62.5 KB/s (512 KBPS) unlimited download speed

The mobile subscription plan’s cost needs to be less than amount of $ you earn per month through Honeygain.

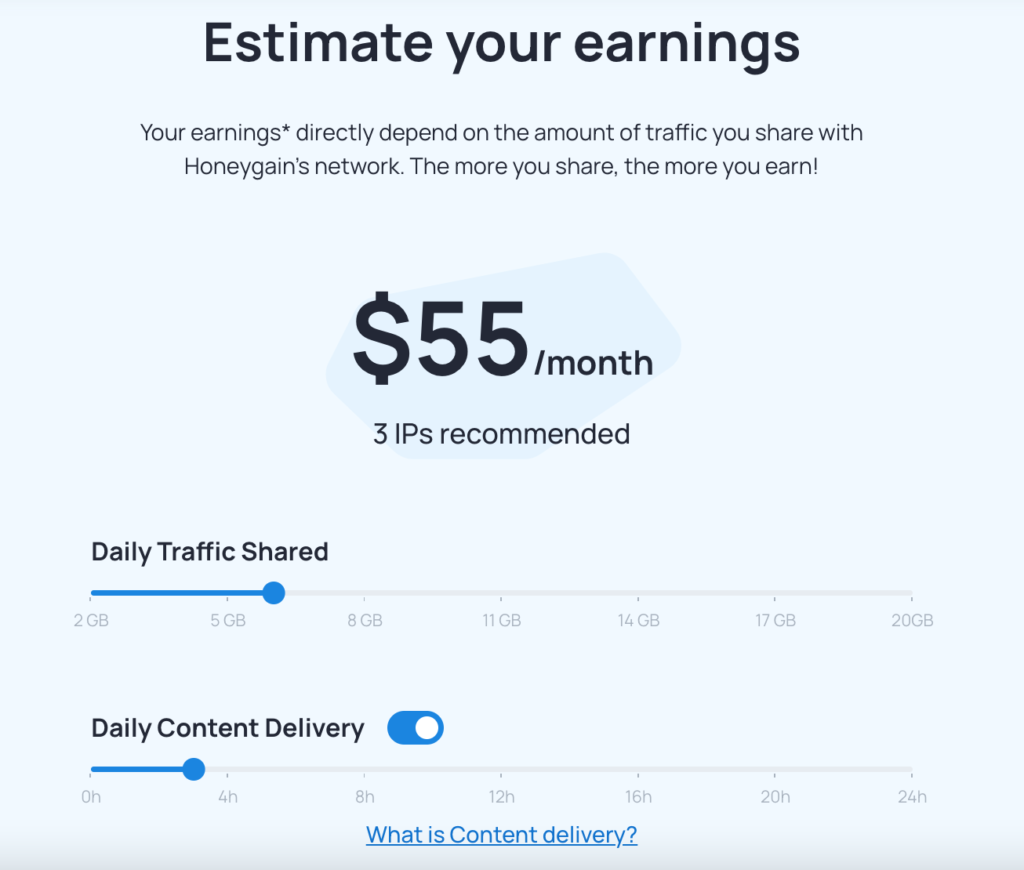
How much do you really earn with Honeygain?

If you take a look at the landing page you will see an estimate on how much you can earn from the app. For example:

Well, to be frank when I first saw the estimate and started playing with the adjustable bars I was so excited and had even started budgeting for ideas like funding a phone with Honeygain and subscription packages.

Then I stumbled upon this post on reddit: https://www.reddit.com/r/Honeygain/comments/xln42o/how_long_does_it_take_to_reach_20/

This is a post about long it takes to make 20$. Looking at the estimate I would have thought that 20$ would easily be achieved, even with 1 IP. Turns out (and it makes sense) that this will depend heavily on where you are located and the demand in your country/area.

In the reddit link above the user has to use 3 devices to make 20$ every 3 months.

So the best way to actually have an estimate would be to run Honeygain for a month. If you scroll down on the landing page you will actually see what factors influence how much you earn from Honeygain.

What is the best Honeygain location?

The best location is defined by the location which has the most demand. My guess is that this would be USA because there are channels which are country locked. Honeygain’s network can help outsiders access these sites. The other most important factor is the content delivery functionality which is only available in a selected countries: https://support.honeygain.com/hc/en-us/articles/4412714740114-List-of-countries-where-Content-Delivery-is-available-

What is the best network choice for Honeygain?

For your mobile subscription it will depend on more than just networking speed and ping as listed on the website. This could easily eat up 1-2 GB of mobile every month so you would need to choose a package which has enough bandwidth or one which continues to work even at a lower speed in case the initial high speed bandwidth has been exhausted.

Ideally, if you can do it choose an unlimited 5g network like Orange offers. It might cost 40$ per month and you won’t be making a profit but you would likely earn more with it.

How to know which mobile subscriptions to get?

The way to calculate this is to have a sample run on your current mobile phone for one month. Based on the website if you have an ideal location which is in demand, a network speed which is above 50 mbps and has lower than 50ms of ping to their servers you could be looking at 18 to 29$ per month on a single IP.

Then it is just a matter of choice, you will need find one subscription which is below that value.

Personal Verdict

With that number in mind you could shop around offers under that price. At the moment in Europe Orange has an unlimited 5g offering which costs 40$ per month with the phone included. 5g satisfies all the networking requirements of speed and latency, and Europe satisfies the location requirement. However, this still means that you would be at a loss here with 29$ – 40$.

(For those living in Europe, Tango used to have an unlimited internet offer at a much cheaper price but I am not sure if the offer is still available.)

So the final verdict is that depending on the factors above and the mobile phone subscriptions available in your country you might be lucky enough to make a profit out of this. I was not. But either way Honeygain will at least help you pay back the phone.

Categories
Development

How to code falling petals with anime.js and css

I recently had to create an invitation card online that required falling petals and a few other animations. I looked at a few options and the easiest one I found was using https://animejs.com/. The complete runnable source code is below:

The Source Code

<html>
<head>
<script src="https://cdnjs.cloudflare.com/ajax/libs/animejs/3.2.1/anime.min.js"></script>

<style>
petal {
  display: inline-block;
  width: 0; height: 0;
  padding: 20px 9px;
  background: rgba(0,0,100,.4);
  transform: rotate(72deg);
  border-top-left-radius: 100px;
  border-bottom-right-radius: 100px;
  background: rgba(245, 30, 188, 0.4);
  position:absolute;
}
</style>

</head>
<body>
<div id="petals">
</div>
<script>

/*
Falling petals
*/

var global_petal_count = 0;
var petal_count_per_wave = 15;
function create (){
  for(var i=0;i<petal_count_per_wave;i++){
    var petal_element = document.createElement("petal");
    petal_element.setAttribute("id", "petal_"+global_petal_count);
    petal_element.classList.add("slowfall");
    petal_element.style.top = Math.floor(Math.random() * 1000* -1);
    petal_element.style.left = Math.floor(Math.random() * 1500);
    document.getElementById("petals").appendChild(petal_element);
    global_petal_count++;
  }
  console.log("creating...");
}
function resolveLater() {
  create();
  var petal_animation = anime.timeline({
  easing: 'easeInOutSine',
  duration: 15000,
  autoplay: true
  });

  var petal_targets = [];

  for(var i=global_petal_count - petal_count_per_wave + 1;i<=global_petal_count; i++){
    petal_targets.push("#petal_"+i);
  }

  petal_animation
  .add({
    targets: petal_targets,
    translateY: 2000,
    rotate: 1000
  })
  .add({
    targets: petal_targets,
    opacity: 0,
  },500)

  return new Promise(resolve => {
    setTimeout(() => {
      resolve(resolveLater());
    }, 5000);
  });

}
async function asyncCall() {
  await resolveLater();
}
asyncCall();
</script>
</body>

</html>

Importing anime.js

The first part in the header is about importing anime.js. At the time of writing I was using version 3.2.1 so I hope by the time you try this it still works but if not feel free to make adjustments or use version 3.2.1

Defining a petal in CSS

What this basically does is to define the color of the petal through the css background color. Define it’s shape through the transforms. Setting it’s position to absolute so that it can overlay other divs later on. In case you have issues making the petals appear on top of other divs you might also think about adjusting the z-index of the petals.

Creating <petal>s in Javascript

Then in the create() function we are dynamically creating <petal></petal> elements. We are creating 15 which is defined by petal_count_per_wave then randomly place them at the top (top:0) and a random value of left. You might extend the range of the random to the width of your window with window. innerWidth.

How to create an infinite asynchronous loop in Javascript with promise

Next is the complicated part and probably something you could use for other projects. We are calling an asynchronous function asyncCall() which will wait for resolveLater() to finish.

At the end of resolveLater() you will see that we call a promise after 5 seconds timeout:

  return new Promise(resolve => {
    setTimeout(() => {
      resolve(resolveLater());
    }, 5000);
  });

In this way we can wait for enough time for the previous batch of petals to start falling before we call the next one. Also, because resolveLater is calling itself, this goes on forever.

How is anime.js involved in making the petals fall?

 var petal_animation = anime.timeline({
  easing: 'easeInOutSine',
  duration: 15000,
  autoplay: true
 });

var petal_targets = [];

  for(var i=global_petal_count - petal_count_per_wave + 1;i<=global_petal_count; i++){
    petal_targets.push("#petal_"+i);
  }

  petal_animation
  .add({
    targets: petal_targets,
    translateY: 2000,
    rotate: 1000
  })
  .add({
    targets: petal_targets,
    opacity: 0,
  },500)

This piece of code is building a list of petal ids that have just been created. This list is passed to petal_animation which is a timeline object from anime.js. The timeline basically says that the petals need to fall by 2000 pixels (TranslateY) and that after 500 milliseconds they need to start fading away to Opacity: 0. What this also means is that the objects still exist but are just invisible.

An improvement would be to perform a cleanup from time to time using the list of petals ids to delete them.

If you are uncertain about any part of the feel free to comment and I will try to assist. Cheers!

Categories
Uncategorized

How to keep up your running motivation

I have recently embarked on a renewed habit; A habit of running at least 5 km every 2 to 3 days. I initially started running as a way to stay healthy and behind all the fun that it is, there is still the health reason.

However, I have to admit that it can be a struggle to maintain motivation over a long period of time. I have written this post in the hopes that what worked for me will work for you as well.

Way #1: Running to lose weight

The first way and the one with which I started was to lose weight and to stay healthy by making it a habit. It can be hard to keep up running with that goal though because although it is easy to lose weight at the start, it starts to become harder as time goes on and as your body becomes accustomed to the running.

Way #2: Try new running routes

Running the same track every day will get you bored. Try new routes and a good way of doing this is to:

  1. install the Strava app
  2. Go to any clubs which is in your location
  3. There you can find those who are running and the routes that they are taking

This was an invaluable piece in me realising where I could run. I had just moved to a new country so I was not familiar with any routes but Strava routes really opened the way for me.

Way #3: Running socially

There is a social network for everything but my way of finding friends to run with are either on Facebook groups or to just take my family members along. Although a lot of times they won’t be able to match your pace you can work around that by finding a route which has a cycle. You can then take advance loops around them.

Way #4: Realise that running improves your mood

I am not sure about you but running clears my mind and improves my mood throughout the day. May be this is the case for all exercises.

Way #5: Running will keep you healthy and you will live longer

My latest motivation is that human evolution has made us into running/walking machines. Running actually makes your body and legs stronger. There is actually strong scientific evidence around this. I would suggest you watch this short video for more information.

Way #6: Breaking previous records and participating in challenges

Another way, again through the Strava App, is to keep track of your previous records. Strava automatically keeps track of your best 1k or 2 miles. Getting the achievements is really satisfying and gives you a way to improve your performance.

I have grouped this together because this uses Strava again (not a sponsored post). You can also participate in challenges on the app and I find this really fun because the app is also a social platform. For example when there is a new month, there is usually a 5 km and 10 km challenge. Whenever you or a friend has completed the challenge you will be able to see it. Somehow, it makes running less lonely, if you know what I mean. I find that it really helps, at least for me.

Anyway I hope that at least one of ways will make you more motivated to run.

Categories
Administration

How to disable containers on Docker service/desktop startup

How to list docker containers which are running?

There is a restart policy associated with every docker container. The first step is to list all the docker containers. You can do that as follows:

docker container ls

You should then get an output as follows:

How to check restart policy of docker containers?

You can do that with docker inspect <insert docker container id here>. Which means for example for our example you would do something like this:

docker inspect bea070eba948

You will get all information about that docker container which can be overwhelming:

[
    {
        "Id": "bea070eba948b52af689bf528d45989ff97bd87e1b22cdfee15f7c0caf9dba27",
        "Created": "2022-08-26T09:32:04.874209501Z",
        "Path": "/opt/eventstore/eventstored",
        "Args": [],
        "State": {
            "Status": "running",
            "Running": true,
            "Paused": false,
            "Restarting": false,
            "OOMKilled": false,
            "Dead": false,
            "Pid": 11241,
            "ExitCode": 0,
            "Error": "",
            "StartedAt": "2022-09-01T13:32:09.695694777Z",
            "FinishedAt": "2022-09-01T13:29:22.540111592Z",
            "Health": {
                "Status": "healthy",
                "FailingStreak": 0,
                "Log": [
                    {
                        "Start": "2022-09-01T13:34:30.122485175Z",
                        "End": "2022-09-01T13:34:30.263994865Z",
                        "ExitCode": 0,
                        "Output": "  % Total    % Received % Xferd  Average Speed   Time    Time     Time  Current\n                                 Dload  Upload   Total   Spent    Left  Speed\n\r  0     0    0     0    0     0      0      0 --:--:-- --:--:-- --:--:--     0\r  0     0    0     0    0     0      0      0 --:--:-- --:--:-- --:--:--     0\n"
                    },
                    {
                        "Start": "2022-09-01T13:34:35.275063904Z",
                        "End": "2022-09-01T13:34:35.404368252Z",
                        "ExitCode": 0,
                        "Output": "  % Total    % Received % Xferd  Average Speed   Time    Time     Time  Current\n                                 Dload  Upload   Total   Spent    Left  Speed\n\r  0     0    0     0    0     0      0      0 --:--:-- --:--:-- --:--:--     0\r  0     0    0     0    0     0      0      0 --:--:-- --:--:-- --:--:--     0\n"
                    },
                    {
                        "Start": "2022-09-01T13:34:40.415449945Z",
                        "End": "2022-09-01T13:34:40.550987054Z",
                        "ExitCode": 0,
                        "Output": "  % Total    % Received % Xferd  Average Speed   Time    Time     Time  Current\n                                 Dload  Upload   Total   Spent    Left  Speed\n\r  0     0    0     0    0     0      0      0 --:--:-- --:--:-- --:--:--     0\r  0     0    0     0    0     0      0      0 --:--:-- --:--:-- --:--:--     0\n"
                    },
                    {
                        "Start": "2022-09-01T13:34:45.562356473Z",
                        "End": "2022-09-01T13:34:45.681111038Z",
                        "ExitCode": 0,
                        "Output": "  % Total    % Received % Xferd  Average Speed   Time    Time     Time  Current\n                                 Dload  Upload   Total   Spent    Left  Speed\n\r  0     0    0     0    0     0      0      0 --:--:-- --:--:-- --:--:--     0\r  0     0    0     0    0     0      0      0 --:--:-- --:--:-- --:--:--     0\n"
                    },
                    {
                        "Start": "2022-09-01T13:34:50.689468456Z",
                        "End": "2022-09-01T13:34:50.832617546Z",
                        "ExitCode": 0,
                        "Output": "  % Total    % Received % Xferd  Average Speed   Time    Time     Time  Current\n                                 Dload  Upload   Total   Spent    Left  Speed\n\r  0     0    0     0    0     0      0      0 --:--:-- --:--:-- --:--:--     0\r  0     0    0     0    0     0      0      0 --:--:-- --:--:-- --:--:--     0\n"
                    }
                ]
            }
        },
        "Image": "sha256:efac5381e100023044a52a9def4c5bdb2b214261252091012efdbdefd920ba38",
        "ResolvConfPath": "/var/lib/docker/containers/bea070eba948b52af689bf528d45989ff97bd87e1b22cdfee15f7c0caf9dba27/resolv.conf",
        "HostnamePath": "/var/lib/docker/containers/bea070eba948b52af689bf528d45989ff97bd87e1b22cdfee15f7c0caf9dba27/hostname",
        "HostsPath": "/var/lib/docker/containers/bea070eba948b52af689bf528d45989ff97bd87e1b22cdfee15f7c0caf9dba27/hosts",
        "LogPath": "/var/lib/docker/containers/bea070eba948b52af689bf528d45989ff97bd87e1b22cdfee15f7c0caf9dba27/bea070eba948b52af689bf528d45989ff97bd87e1b22cdfee15f7c0caf9dba27-json.log",
        "Name": "/node1.eventstore",
        "RestartCount": 0,
        "Driver": "overlay2",
        "Platform": "linux",
        "MountLabel": "",
        "ProcessLabel": "",
        "AppArmorProfile": "",
        "ExecIDs": null,
        "HostConfig": {
            "Binds": [
                "/Users//Documents/work/docker/21.10.2/certs:/certs:rw",
                "9fb2d7769d37a33f1c7f530c37c9dcfb689a8c6eba580be3301eb5cd90faebe2:/var/lib/eventstore:rw",
                "a436d2ec32204411ecba492b1a5b73b610c51e427de0c5c6e849e4f98b1f6307:/var/log/eventstore:rw"
            ],
            "ContainerIDFile": "",
            "LogConfig": {
                "Type": "json-file",
                "Config": {}
            },
            "NetworkMode": "eventstoredb.local",
            "PortBindings": {
                "1113/tcp": [
                    {
                        "HostIp": "",
                        "HostPort": "1111"
                    }
                ],
                "2113/tcp": [
                    {
                        "HostIp": "",
                        "HostPort": "2111"
                    }
                ]
            },
            "RestartPolicy": {
                "Name": "always",
                "MaximumRetryCount": 0
            },
            "AutoRemove": false,
            "VolumeDriver": "",
            "VolumesFrom": [],
            "CapAdd": null,
            "CapDrop": null,
            "CgroupnsMode": "private",
            "Dns": [],
            "DnsOptions": [],
            "DnsSearch": [],
            "ExtraHosts": null,
            "GroupAdd": null,
            "IpcMode": "private",
            "Cgroup": "",
            "Links": null,
            "OomScoreAdj": 0,
            "PidMode": "",
            "Privileged": false,
            "PublishAllPorts": false,
            "ReadonlyRootfs": false,
            "SecurityOpt": null,
            "UTSMode": "",
            "UsernsMode": "",
            "ShmSize": 67108864,
            "Runtime": "runc",
            "ConsoleSize": [
                0,
                0
            ],
            "Isolation": "",
            "CpuShares": 0,
            "Memory": 0,
            "NanoCpus": 0,
            "CgroupParent": "",
            "BlkioWeight": 0,
            "BlkioWeightDevice": null,
            "BlkioDeviceReadBps": null,
            "BlkioDeviceWriteBps": null,
            "BlkioDeviceReadIOps": null,
            "BlkioDeviceWriteIOps": null,
            "CpuPeriod": 0,
            "CpuQuota": 0,
            "CpuRealtimePeriod": 0,
            "CpuRealtimeRuntime": 0,
            "CpusetCpus": "",
            "CpusetMems": "",
            "Devices": null,
            "DeviceCgroupRules": null,
            "DeviceRequests": null,
            "KernelMemory": 0,
            "KernelMemoryTCP": 0,
            "MemoryReservation": 0,
            "MemorySwap": 0,
            "MemorySwappiness": null,
            "OomKillDisable": null,
            "PidsLimit": null,
            "Ulimits": null,
            "CpuCount": 0,
            "CpuPercent": 0,
            "IOMaximumIOps": 0,
            "IOMaximumBandwidth": 0,
            "MaskedPaths": [
                "/proc/asound",
                "/proc/acpi",
                "/proc/kcore",
                "/proc/keys",
                "/proc/latency_stats",
                "/proc/timer_list",
                "/proc/timer_stats",
                "/proc/sched_debug",
                "/proc/scsi",
                "/sys/firmware"
            ],
            "ReadonlyPaths": [
                "/proc/bus",
                "/proc/fs",
                "/proc/irq",
                "/proc/sys",
                "/proc/sysrq-trigger"
            ]
        },
        "GraphDriver": {
            "Data": {
                "LowerDir": "/var/lib/docker/overlay2/8a5bb0eb8863751ef1b1ec3e48ac594e3c3e6f11e607586587c3828ffdcd7218-init/diff:/var/lib/docker/overlay2/6f6bb5d2179661f2e1c84bfe4f4b65cb5b81002de82771aed39204ac3b96d344/diff:/var/lib/docker/overlay2/5ad6775653d74051fa05c082749b5f6db40050ad7130416b5cb3ee4f7ac66b25/diff:/var/lib/docker/overlay2/c1503082a3fc668ed648bcc70e6d078611b2783c4fd15e7a18da49c521e303ae/diff:/var/lib/docker/overlay2/9a28c539bc7dca97875130b9356c6a99745616f26696acea67b8e3baf1984b9b/diff:/var/lib/docker/overlay2/f8d5c1f5f16c60e8fffc6e10837d7d54931b23bf4a8f03689ee8d86ab60537b9/diff:/var/lib/docker/overlay2/a8ef5ee6c63068cb6db823c01a61a777ae9b64defc78876e6d6e6c16b46f2c2f/diff:/var/lib/docker/overlay2/ba8e1e96c2431d51d64b5c3a8cd6b916c60310906eff26fc0bf3c8705a2d2076/diff:/var/lib/docker/overlay2/9afb116e4bdbbcf264df7a488dd9c53a57155d9aebd055852e3f274dd39a0ba1/diff:/var/lib/docker/overlay2/7001ba357bb61e6b56774ab1ea36c6bbd2ef343491dd157dbba79662786da5b5/diff:/var/lib/docker/overlay2/e43d28d89ecb8d7ccd4e9ea0f581f4a2fd634fb09893b664137df51a179a7653/diff",
                "MergedDir": "/var/lib/docker/overlay2/8a5bb0eb8863751ef1b1ec3e48ac594e3c3e6f11e607586587c3828ffdcd7218/merged",
                "UpperDir": "/var/lib/docker/overlay2/8a5bb0eb8863751ef1b1ec3e48ac594e3c3e6f11e607586587c3828ffdcd7218/diff",
                "WorkDir": "/var/lib/docker/overlay2/8a5bb0eb8863751ef1b1ec3e48ac594e3c3e6f11e607586587c3828ffdcd7218/work"
            },
            "Name": "overlay2"
        },
        "Mounts": [
            {
                "Type": "bind",
                "Source": "/Users//Documents/work/docker/21.10.2/certs",
                "Destination": "/certs",
                "Mode": "rw",
                "RW": true,
                "Propagation": "rprivate"
            },
            {
                "Type": "volume",
                "Name": "9fb2d7769d37a33f1c7f530c37c9dcfb689a8c6eba580be3301eb5cd90faebe2",
                "Source": "/var/lib/docker/volumes/9fb2d7769d37a33f1c7f530c37c9dcfb689a8c6eba580be3301eb5cd90faebe2/_data",
                "Destination": "/var/lib/eventstore",
                "Driver": "local",
                "Mode": "rw",
                "RW": true,
                "Propagation": ""
            },
            {
                "Type": "volume",
                "Name": "a436d2ec32204411ecba492b1a5b73b610c51e427de0c5c6e849e4f98b1f6307",
                "Source": "/var/lib/docker/volumes/a436d2ec32204411ecba492b1a5b73b610c51e427de0c5c6e849e4f98b1f6307/_data",
                "Destination": "/var/log/eventstore",
                "Driver": "local",
                "Mode": "rw",
                "RW": true,
                "Propagation": ""
            }
        ],
        "Config": {
            "Hostname": "bea070eba948",
            "Domainname": "",
            "User": "eventstore",
            "AttachStdin": false,
            "AttachStdout": false,
            "AttachStderr": false,
            "ExposedPorts": {
                "1112/tcp": {},
                "1113/tcp": {},
                "2112/tcp": {},
                "2113/tcp": {}
            },
            "Tty": false,
            "OpenStdin": false,
            "StdinOnce": false,
            "Env": [
                "EVENTSTORE_CLUSTER_SIZE=3",
                "EVENTSTORE_RUN_PROJECTIONS=All",
                "EVENTSTORE_DISCOVER_VIA_DNS=false",
                "EVENTSTORE_ENABLE_EXTERNAL_TCP=True",
                "EVENTSTORE_ENABLE_ATOM_PUB_OVER_HTTP=true",
                "EVENTSTORE_ADVERTISE_HOST_TO_CLIENT_AS=127.0.0.1",
                "EVENTSTORE_INT_IP=172.30.240.11",
                "EVENTSTORE_ADVERTISE_HTTP_PORT_TO_CLIENT_AS=2111",
                "EVENTSTORE_ADVERTISE_TCP_PORT_TO_CLIENT_AS=1111",
                "EVENTSTORE_GOSSIP_SEED=172.30.240.12:2113,172.30.240.13:2113",
                "EVENTSTORE_TRUSTED_ROOT_CERTIFICATES_PATH=/certs/ca",
                "EVENTSTORE_CERTIFICATE_FILE=/certs/node1/node.crt",
                "EVENTSTORE_CERTIFICATE_PRIVATE_KEY_FILE=/certs/node1/node.key",
                "EVENTSTORE_DISABLE_EXTERNAL_TCP_TLS=True",
                "affinity:container==506d32118bcd78c495c26e138bd47f8c2a7a09322cc9a24d0ed2419813f8b390",
                "PATH=/usr/local/sbin:/usr/local/bin:/usr/sbin:/usr/bin:/sbin:/bin",
                "ASPNETCORE_URLS=http://+:80",
                "DOTNET_RUNNING_IN_CONTAINER=true",
                "LANGUAGE=en_US:en",
                "DEBIAN_FRONTEND=noninteractive",
                "ACCEPT_EULA=Y"
            ],
            "Cmd": null,
            "Healthcheck": {
                "Test": [
                    "CMD-SHELL",
                    "curl --fail --insecure https://node1.eventstore:2113/health/live || exit 1"
                ],
                "Interval": 5000000000,
                "Timeout": 5000000000,
                "Retries": 24
            },
            "Image": "eventstore/eventstore:21.10.2-buster-slim",
            "Volumes": {
                "/certs": {},
                "/var/lib/eventstore": {},
                "/var/log/eventstore": {}
            },
            "WorkingDir": "/opt/eventstore",
            "Entrypoint": [
                "/opt/eventstore/eventstored"
            ],
            "OnBuild": null,
            "Labels": {
                "com.docker.compose.config-hash": "c8e628d9d0bf1ecee578c8f765da4d972c6757492d4413f08edcfae5f7aae3da",
                "com.docker.compose.container-number": "1",
                "com.docker.compose.oneoff": "False",
                "com.docker.compose.project": "21102",
                "com.docker.compose.project.config_files": "docker-compose.yaml",
                "com.docker.compose.project.working_dir": "/Users//Documents/work/docker/21.10.2",
                "com.docker.compose.service": "node1.eventstore",
                "com.docker.compose.version": "1.29.2"
            }
        },
        "NetworkSettings": {
            "Bridge": "",
            "SandboxID": "b92fb5032ddce833e8bd46f5059a7eec96677ee9c435c444941fc14c2d04e003",
            "HairpinMode": false,
            "LinkLocalIPv6Address": "",
            "LinkLocalIPv6PrefixLen": 0,
            "Ports": {
                "1112/tcp": null,
                "1113/tcp": [
                    {
                        "HostIp": "0.0.0.0",
                        "HostPort": "1111"
                    }
                ],
                "2112/tcp": null,
                "2113/tcp": [
                    {
                        "HostIp": "0.0.0.0",
                        "HostPort": "2111"
                    }
                ]
            },
            "SandboxKey": "/var/run/docker/netns/b92fb5032ddc",
            "SecondaryIPAddresses": null,
            "SecondaryIPv6Addresses": null,
            "EndpointID": "",
            "Gateway": "",
            "GlobalIPv6Address": "",
            "GlobalIPv6PrefixLen": 0,
            "IPAddress": "",
            "IPPrefixLen": 0,
            "IPv6Gateway": "",
            "MacAddress": "",
            "Networks": {
                "eventstoredb.local": {
                    "IPAMConfig": {
                        "IPv4Address": "172.30.240.11"
                    },
                    "Links": null,
                    "Aliases": [
                        "bea070eba948",
                        "node1.eventstore"
                    ],
                    "NetworkID": "b5b789d16d59f504159492e24ccf89cc3c19be47b1f25100b768fcc53e613e81",
                    "EndpointID": "e183f6724970d74658d472ed54688c8e886acfc07300b88ed21763085976f780",
                    "Gateway": "172.30.240.1",
                    "IPAddress": "172.30.240.11",
                    "IPPrefixLen": 24,
                    "IPv6Gateway": "",
                    "GlobalIPv6Address": "",
                    "GlobalIPv6PrefixLen": 0,
                    "MacAddress": "02:42:ac:1e:f0:0b",
                    "DriverOpts": null
                }
            }
        }
    }
]

This is a lot of information and we are not interested in that. The information provided is in JSON if ever you are need to parse it programmatically this will come in handy. For our case I would just paste it somewhere and search for “RestartPolicy”. This is what it likely looks like:

"RestartPolicy": {
                "Name": "always",
                "MaximumRetryCount": 0
            }

The above shows that it will always restart and we need to change that.

How to update docker container restart policy?

That is easy you need to run docker update –restart=no <insert container id here> which in our case becomes:

docker update --restart=no bea070eba948

Then if you inspect the container again you should see the following:

            "RestartPolicy": {
                "Name": "no",
                "MaximumRetryCount": 0
            },

The policy has now been updated from Always to no.

Categories
Development

How to install and run Rust/Cargo through Docker

This post explains how to install Rust on a Docker container and then use that container to compile Rust files/projects on your machine.

Dockerfile

Create a folder for your Rust Docker Container. Inside that folder create a file named “Dockerfile”. Inside put the following:

FROM rust:1.58

This means creating a container with Rust version 1.58. You can change the version per your needs.

Run the following command to create the container:

docker build --tag rust-docker .

This command will create a Docker container and give it “rust-docker” as the name. You will then use this same name “rust-docker” when calling it to compile Rust files.

How to compile Rust project through Docker?

Let’s say for the sake of the test that your project is located at /Users/username/Documents/RustProject

You will need to mount that path so that the Docker container gets access to that path. Then you need to provide a command for example “Cargo Run” to run on that project.

docker run -v /Users/username/Documents/RustProject:/project rust-docker cargo run 

Oops when you run this you will get “error: could not find Cargo.toml in / or any parent directory”. This is because by default cargo run will execute in the / directory but you can’t set the mapping in Docker to /. For example the command below is illegal:

docker run -v /Users/username/Documents/RustProject:/ rust-docker cargo run

docker: Error response from daemon: invalid volume specification: ‘/host_mnt/Users/username/Documents/RustProject:/’: invalid mount config for type “bind”: invalid specification: destination can’t be ‘/’.

See ‘docker run –help’

How to point Cargo Run to a project path?

Thankfully the docs are really helpful. If you check under the manifest options: https://doc.rust-lang.org/cargo/commands/cargo-build.html#manifest-options you will see that you can point Cargo towards the toml file, so let’s do just that:

docker run -v /Users/username/Documents/RustProject:/project rust-docker cargo run --manifest-path /project/Cargo.toml

Tada! that should do it. You can run all the necessary commands from that Docker container. Hope this has helped you 🙂

Note: I initially got this issue because I had to install Gigabytes of libraries on MacOS (because I had to install xcode-select or some bullshit)

Update: adding one caveat of running Rust through Docker like that is that a new Docker container is spun up every time you run the above command and if it is long running and you want to stop the process you will need to delete/kill the container.