
This blog post explains step by step (in as much detail as I could remember) how to start working with the world’s fastest web framework on TechEmpower’s Fortune benchmarks (at the time of writing) Drogon c++ on Visual Studio on Windows 10.
Disclaimer that this was only tested with Visual Studio 2022
TechEmpower’s Fortune benchmark covers ORM, database connectivity, dynamic-size collections, sorting, server-side templates, XSS countermeasures, and character encoding
Step 1: Install Visual Studio
If you install Visual Studio 2022 you will by default install vcpkg together with it. There is a limitation with that version though, it only works in manifest mode. This guide uses the classic mode which means that we will later cover how to install vcpkg independently.
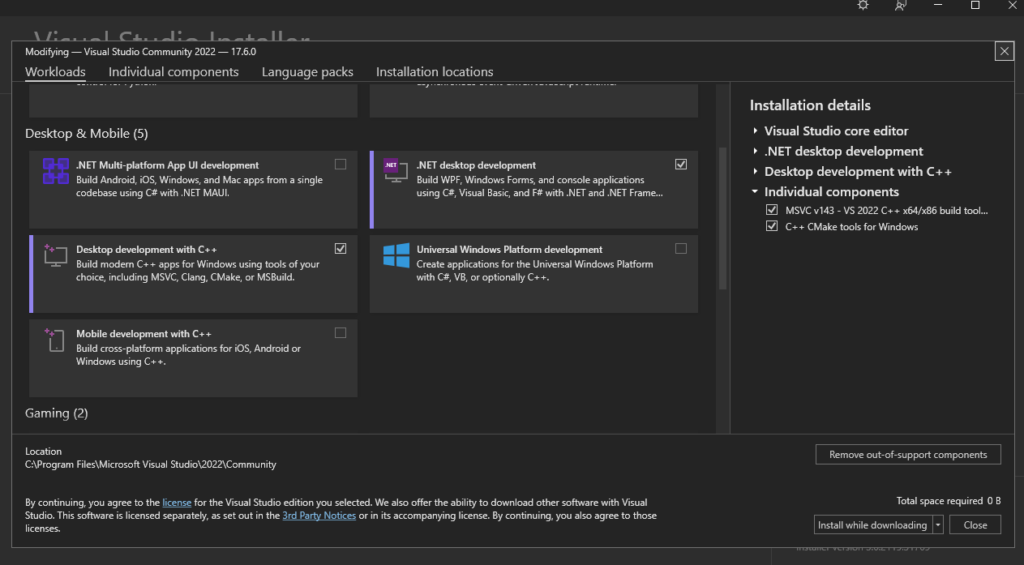
Anyway launch Visual Studio Installer, click on modify then install Desktop Development with C++ as shown in the picture below.
Step 2: How to install vckpg on Windows?
- Open a Command Prompt in Administrator mode. This is important for the setup. Without Administrator mode you will get “error: failed to install system targets file vcpkg”.
- Follow the steps at https://vcpkg.io/en/getting-started.html which firstly to clone the repo:
- git clone https://github.com/Microsoft/vcpkg.git
- Run the batch file: .\vcpkg\bootstrap-vcpkg.bat
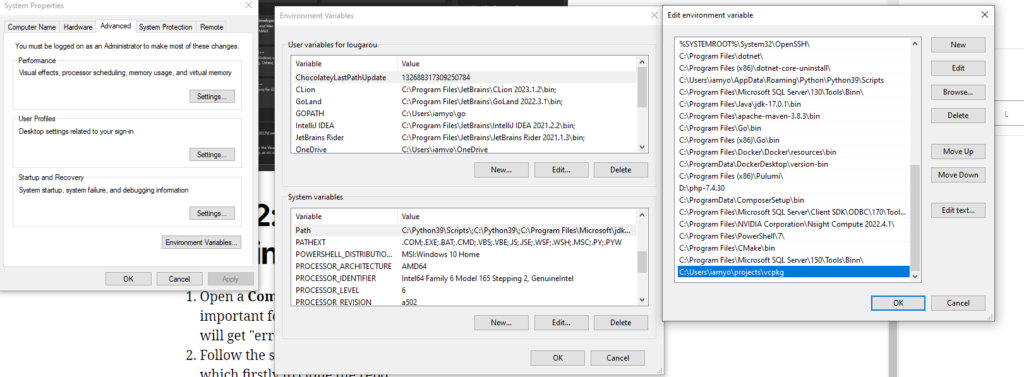
- Start -> type “Edit the system environment Variables” -> “click on “Environment Variables” -> Edit path and add the path to vcpkg as shown below
6. Now open a new command prompt again in administrator mode. Run the following:
vcpkg integrate install
7. Next install drogon by running
vcpkg.exe install drogon[ctl]:x64-windows or
vcpkg.exe install drogon
Step 3. How to make Visual Studio use your custom vcpkg.exe?
- Open Visual Studio
- Create a CMake C++ Project or clone this sample repo: https://github.com/Lougarou/getting-started-with-drogon-on-windows
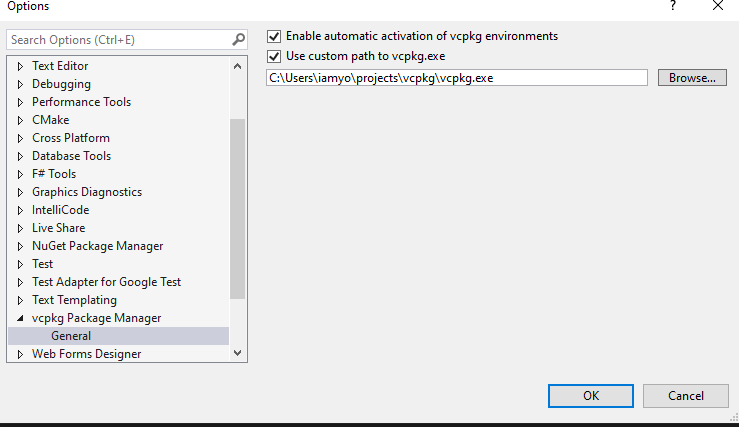
- Go to Tools->vcpkg Package Manager->Use custom path to vcpkg.exe then point it to the .exe that you have just installed as shown below:
4. Open CMakePresets.json file and point to the custom toolchain file. For example the repo above uses “toolchainFile”: “C:\Users\iamyo\projects\vcpkg\scripts\buildsystems\vcpkg.cmake” which you will need to change to your own.
5. Modify the CMakeLists.txt to use C++ 17 or 14 using the following:
set_property(TARGET blog PROPERTY CXX_STANDARD 17)6. Modify the CMakeLists.txt of the project to include drogon as follows:
find_package(Drogon CONFIG REQUIRED)
target_link_libraries(blog PRIVATE Drogon::Drogon)
You can check the sample repo to see what it looks like if you are confused as to which file to modify. That’s it you should now be able to compile and run your project on Visual Studio!